
Interested in becoming a content generating machine but you’re unsure where to start? The podcast approach is a great way to get started on this. We’re going to teach you how to from start to finish, record, edit and distribute your podcast so that you have a diversity of authentic and thought leadership content available to post daily for you and your business.
Step 1: Audio Equipment
Equipment is first and foremost of course, but it definitely does not need to break the bank. In-house here in 3B1 we use Rode equipment in the form of Rode Microphones and a Rodecaster. But recording a podcast can be as simple as plugging a microphone into your phone. Here are some of our favourite pieces of equipment for the big and small budgets and the stuff we recommend to our clients.
Rodecaster Pro: This is a fantastic piece of kit and the one we use on The Digital Marketing Scoop Podcast. It records with ease, you can add in special effects, control the volume of the mics directly from the board live (if one guest has a louder voice than another for example). If you’re willing to invest a little in your show, we have found this to be a fantastic machine. One downside is that when recording, once you hit 30 minutes it starts recording a second file. Just remember to save both once you’re done to stitch them together in editing.
Rodecaster Microphones: We’ve tried a few and honestly these are the bees knees. Sound quality is just fantastic from these. They make every other microphone sound shocking. We initially had a spare microphone that wasn’t Rode, and when we used it, despite the spare microphone being of good quality, it stood out like a sore thumb next to these mics. If you plan on having guests either get two or more of these or else invest in something completely different. The difference in sound is just too vast to use these in combination with a cheaper alternative. Another downpoint of these is that you have to be close to the mic, moving away or turning your head can diminish the level of sound.
Shure iPhone Microphone: These are fantastic if you want to get started by using your iPhone. There’s no reason why you can’t just use your phone and laptop to record. We enjoy the Rodecaster to record as it helps us control the volume and does everything we need, but this is a cheaper and just as reliable option. This option however isn’t ideal for the aesthetics of creating a podcast style video as you’ll be missing the optical of the microphone. That’s just aesthetics though.
PreSonus AudioBox Kit: You can also opt for a cheaper kit like this one to get going. However, as we haven’t tried and tested these, we’re not making any recommendation, this is just an example of what is out there. Worth checking out and researching for sure.
Step 2: Video Equipment
Video recording your podcast is a no-brainer and a great way to hit two birds with one stone getting two forms of content in one go. Again, this is another area where costs can be kept low. Here in 3B1 we have an in-house videographer who recommends the following equipment for budgets big and small.
Nikon D3400 and D3300: These two are a great piece of equipment. In-house Mark the Director in 3B1 owns a D3300 and Jen one of our Digital Marketing Managers owns a D3400. The quality of video from them is both fantastic and there’s no real difference between them from a visual viewpoint when we compared videos. However, the D3400 is the new model making it slightly better technically, but there’s one downfall. The newer D3400 needs an adapter to plug in microphones whereas mics can go directly into the D3300. They also both stop recording after 20 minutes (common in DSLRs to our surprise when we found out considering the price on DSLRs)
Sony A7 iii: Our videographer uses two of these and they are an absolutely fantastic piece of equipment if you have the budget for them. These are fancy and our clients are always impressed by the quality of output from them. They do come with the same stipulation as the Nikons, they have a 20 minute cut off time for videos. So anything longer than 20 minutes, you either need someone operating them or you need to get up and start them again.
The Phone In Your Back Pocket: In-house a couple of us have iPhone 11s which produce 4K quality videos. That’s the same as the big shunky cameras above. There is no reason why you can’t record these to a high quality on your phone. All you need is a sturdy iPhone or Android tripod like this one here.
Step 3: Getting The Recording Ball Rolling
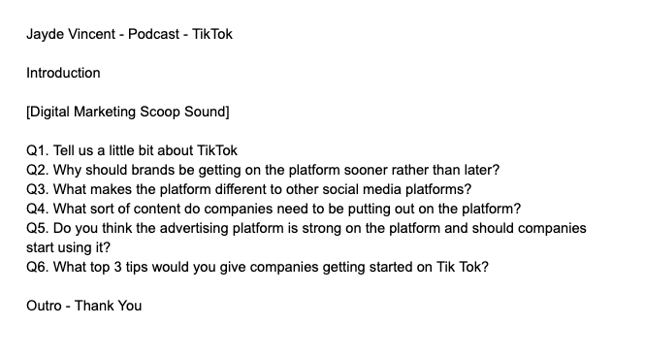
Sometimes it’s good to just dive into conversations but there is always the fear in a podcast conversation of silence. Sure this can be edited out, but actually the best way we find to keep the conversation moving is by using a 6 point strategy. Every podcast we do we write down the 6 points we want to touch on and write a question around the point. This way when conversation begins to fade on one topic you can roll into the next. These questions also make perfect start and cut off points for the video clips generated in the same breath. Here is an example from our recent podcast:
Step 4: Edit
Once you have recorded your podcast you’re going to want to tidy things up before showing the world. You’ll also want to subtitle it and make everything pretty. Here is the step by step editing guide that we use here in-house in 3B1.
- Use Filmora or your preferred video editing software to put the video together. Our in-house videographer uses Adobe Premiere, us digital marketers in the company tend to use Filmora.
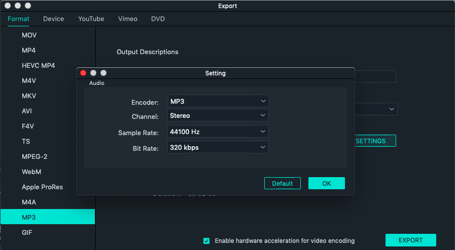
- Once you’re happy with the full length video, using Filmora export the audio as .MP3. Make sure to change the bitrate to 320 on the sound to keep the high quality of the sound. Additional and more intricate editing can be done using a free tool like Audacity.
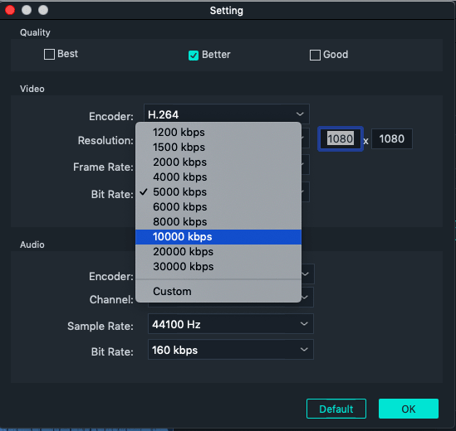
- Now that your podcast file is exported – export the full video as .mp4 – play with the bit rate to get the full video 500MB or less (don’t go too low!) or 1GB or less if you have a premium subscription with Kapwing.com (This will come into play in point 6). A quick and easy way to do this is by playing with the bit rate. Again don’t go too low with this or you’ll make too big a dent in your video quality.
- Upload the video and mark it private or schedule it on YouTube.
- Leave YouTube work it’s magic (do nothing) and about 20-30 minutes after upload YouTube should have auto-generated some captions for you. (It’s the most accurate trust me I’ve tried countless services and don’t bother with typing them yourself there’s a high risk of going insane.)
- Use kapwing.com studio and upload your video (size dependent on your level of service highlighted in point 5). Use the padding options on the right to create space above and below your video if you want to add a title and subtitles. I personally use 3 above and 3 below and it works nicely for me across all platforms then once I export in 1080×1080.
- Back on YouTube have a listen and read and make sure that the subtitles are correct and download the .srt file once you’ve saved any edits.
- On Kapwing, upload the .srt file to the video uploaded in step 6 and make any text size and font changes you want to make and then download the video again.
- Cut the video as required for your podcast clips.
Step 5 – Podcast Distribution
Now that you have your podcast file you’re going to want to distribute it. We use a service called buzzsprout for our distribution. We find it great as it also has a transcription service which allows us to auto generate blog posts from the podcasts. (Great for SEO). This service does come with a subscription fee of 12 US dollars a month . However it’s main competitor Anchor which allows you to record directly from your phone is free and a fantastic alternative. If you choose anchor it might be worthwhile looking for an alternative transcription service like Rev.
Step 6 – Start Promoting Your Podcast
This part is the fun part. Start posting your videos across your social media platforms and start building your listenership. Use paid social media ads to reach further, or just get started like we did organically with the Digital Marketing Scoop Podcast and post daily clips and create an organic content calendar around your platform. Ours looked like this at the beginning:
Thursday: Podcast episode now live post.
Friday: Speak peek/guest introduction for next Thursdays guest
Monday: Video Snippet of Next Podcast Post
Tuesday: Video Snippet of Next Podcast Post
Wednesday: Video Snippet Next Podcast Post
Thursday: Podcast episode live post
Key Bonus Tips From Our Experience
- Stay consistent if your podcast is weekly you need to push it out weekly. No excuses.
- 10-30 minutes seems to hold listeners nicely for a business podcast
- Do not use your podcast as a sales tool. Nobody will tune in if it sounds like a 30 minute advertisement for your company.
If you would like professional guidance on your podcast idea or concept, recording, distribution or advertising talk to us here in 3B1. To find out more contact us here.